Record Macro
The Macro Recorder can be used to record simple macros.
Recording macros is very useful even if you are a very experienced programmer, although there are some limitations that you need to be aware of.
If you are relatively new to macros it is worth rehearsing your steps first before recording them.
This will help you to understand the code that is generated and to help make your code as efficient as possible.
When you record a macro Excel is basically recording the keystrokes, menu commands exactly as they are pressed.
After you have recorded a few single steps you can run the macro to perform the required task again and again.
Once you start the Macro Recorder all your keystrokes will be recorded and converted into VBA code.
Record your Macro
There is a button on the status bar that you can use to quickly record a macro.
 |
The button on the status bar is just a shortcut to the "Record Macro" button on the Developer Tab.
The default location for your macro will be "This Workbook".
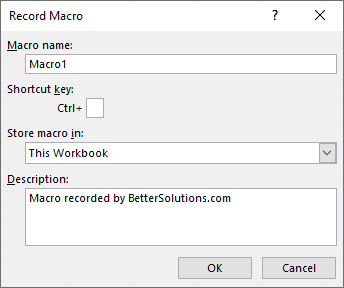 |
The name of your macro will default to "Macro1", "Macro2", etc.
The exact number will depend on the number of macros that have already been recorded in that specific workbook.
Macro names must begin with a letter and cannot resemble cell addresses (i.e. A1, B5, BT100 etc).
Macro names cannot include spaces although the underscore character can be used (e.g. "macroname_2").
You can also include numbers in your macro names.
It is sometimes easier to accept the default name and then change the name of the procedure later.
The shortcut key and description are optional.
Stop Recording
You can stop recording at any time by using the Stop Recording button on the Developer tab.
Alternatively you can use the first button on the Status Bar.
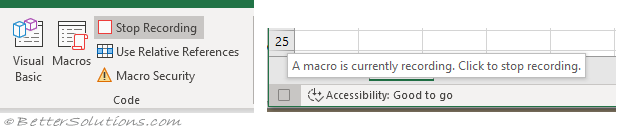 |
It is very important to stop recording once you have finished otherwise Excel will carry on recording your keystrokes indefinitely.
Once you have finished recording you can cut and paste the code (via the clipboard) to different code modules.
Macro Recorder Limitations
There are a number of things that the macro recorder cannot generate code for:
*) Performing any loops or repeating statements (If, Do, While, Select etc)
*) Create or assign variables
*) Display any dialog boxes
*) Contain any error handling
*) Create functions (you can only create subroutines)
*) Code cannot be placed inside existing macros or subroutines.
*) Local settings or user options will be taken into account
Absolute or Relative
During macro recording cell references can be made either relative to the start position or with an absolute address.
By default, recorded macros use absolute cell referencing.
This means the exact cell references are recorded into the macros.
You can switch back and forth between these two macro recording settings as many time as you want.
When you record a macro it will be recorded with "absolute recording" by default.
To emphasis the two different settings we are going to perform some very simple formatting to a table of data.
First using absolute references and then using relative references.
 |
Understanding the Difference
A lot of the code is the same but there is a difference between how the cells are selected.
When you use absolute references, selecting or moving from one cell to another generates code that refers to that specific cell range.
Range("C3:C7").Select
In the case of relative references the code generated is a reference to a cell in relation to the active cell (i.e. the cell initially selected)
ActiveCell.Offset(1, 1).Range("A1:A5").Select
Absolute / Relative Recording
When you record a macro it will be recorded with "absolute recording" by default.
This is an example of some code that has been recorded using Absolute Recording:
Range("B2").Select
ActiveCell.Value = "some text"
Range("B4").Select
When you select (or move) from one cell to another the exact cell range will be used.
You can switch to Relative Recording at any time.
This is an example of some code that has been recorded using Relative Recording:
ActiveCell.Offset(-2,2).Range("A1").Select
ActiveCell.Value = "some text"
ActiveCell.Offset(10,-3).Range("A1").Select
Absolute Cell References
Excel will default to recording all the cell references as Absolute. These are recorded in A1 notation.
This means that any cell references that are selected are explicitly referred to and you will always get exactly the same result when the macro is played back.
Absolute references are useful when you want to perform the same action in an identical place every time.
The second button on this toobar will toggle between recording in Absolute mode and recording in Relative mode.
When this button is pressed, relative references are used and when it is not pressed absolute references are used.
Example
Select cell "B2" before you select (Tools > Macros > Record New Macro).
1) In the Macro Name box type "Absolute".
2) Select the cells "C3:C7".
3) Choose a colour using the Fill Color button on the Formatting toolbar.
4) Select the cells "D3:D7".
5) Choose another colour using the Fill Color button on the Formatting toolbar.
6) Press the bold and italic buttons on the formatting toolbar.
7) Select the cells "E3:E7".
8) Choose another colour using the Fill Color button on the Formatting toolbar.
9) Press the Stop Recording button on the Stop Recording toolbar.
If the Stop Recording toolbar did not appear automatically when you started recording you can display it by selecting (View > Toolbars > Stop Recording).
This recorded macro produces the following code:
Sub Absolute()
    Range("C3:C7").Select
    With Selection.Interior
        .ColorIndex = 1
        .Pattern = xlSolid
    End With
    Range("D3:D7").Select
    With Selection.Interior
        .ColorIndex = 2
        .Pattern = xlSolid
    End With
    Selection.Font.Italic = True
    Range("E3:E7").Select
    With Selection.Interior
        .ColorIndex = 3
        .Pattern = xlSolid
    End With
End Sub
Relative Cell References
In some cases you may want the recorded macro to work with cell references that are Relative to a particular cell. These are recorded in R1C1 notation.
For example you might want to enter some data into the active cell and also enter some data into the cell directly below.
Relative references are useful when you want to perform an action anywhere on a worksheet.
You can change to relative recording by pressing the button on the right hand side of the Stop Recording toolbar. This button is a toggle.
You can change between absolute and relative references at any time while you are recording your macro.
Be aware that there is no indication given other than the button being pushed in, as to which mode you are currently in. The first recorded macro in a workbook will always start by using absolute references.
If you stop recording when you have been using relative references the next recorded macro will start by using relative references.
Using relative references will generate code that always refers to the cell currently selected before you start recording and then uses the "Offset" method to obtain the relative cell address.
Example
Select cell "B2" before you select (Tools > Macros > Record New Macro).
10) In the Macro Name box type "Relative".
11) Select the Relative References button on the Stop Recording toolbar.
12) Repeat exactly the same steps 2-8 as above.
13) Select the Relative References button again to switch back to Absolute References.
14) Press the Stop Recording button on the Stop Recording toolbar.
This recorded macro produces the following code:
Sub Relative()
    ActiveCell.Offset(1, 1).Range("A1:A5").Select
    With Selection.Interior
        .ColorIndex = 1
        .Pattern = xlSolid
    End With
    ActiveCell.Offset(0, 1).Range("A1:A5").Select
    With Selection.Interior
        .ColorIndex = 2
        .Pattern = xlSolid
    End With
    Selection.Font.Italic = True
    ActiveCell.Offset(0, 1).Range("A1:A5").Select
    With Selection.Interior
        .ColorIndex = 3
        .Pattern = xlSolid
    End With
End Sub
© 2026 Better Solutions Limited. All Rights Reserved. © 2026 Better Solutions Limited TopPrevNext